1 - Membership
My GLOW menu -> My Account
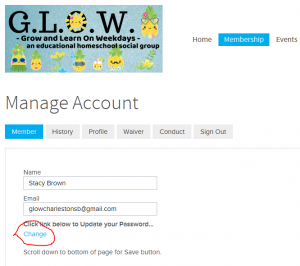
Below Name and Email is
Click link below to Update your Password…
Change
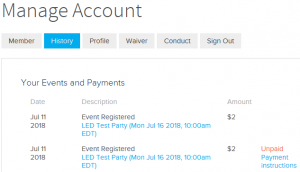
My GLOW menu -> My Events and Payments
Note: If your unpaid Amount is $0.01 per child, you are on the Waitlist.
2 - Events - Sign Up
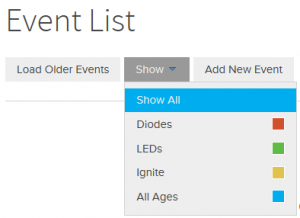
To see what the event name color means, or to filter by an event category, click the Show drop-down tab in the Event List or Event Calendar.
Event payment is expected to be sent when registering for the event. Unpaid event registrations may be cancelled after 24 hours unless otherwise noted in the event. Contact the event organizer directly by email or Facebook messenger if you need to make other arrangements.
All refunds are at the discretion of the event organizer. Refunds are generally not given the day before and day of the event. We do not want to encourage no-shows and last minute drop outs. If there is a waitlist and a replacement can be found, a refund can be issued. Some events require pre-payment or a deposit. Refunds are not given for these events unless a replacement is found.
Every event has an extra dollar added to the ticket price that goes to the organizer. This is not optional – we want to encourage people to schedule events. How the extra dollar is added is decided by the event organizer. It can be per family, per child, per person, etc. (This is part of our Member-Organizer-Vendor Win-Win-Win philosophy.)
My GLOW menu – My Events and Payments
Find the event under Your Events and Payments
On the right of the event description, there is a link for Payment Instructions if a payment has not been recorded yet. If there is not a link, then a payment has been recorded. Contact the event organizer if you have questions.
Note: If your Amount is Blank or $0.01 per person you are on the Waitlist.
My GLOW menu -> My Events and Payments
Note: If your unpaid Amount is $0.01 per child, you are on the Waitlist.
3 - Events - Create and Manage
These guidelines are required for event approval and should be followed when organizing, scheduling, and leading an event.
Everyone involved in organizing or leading an event is a representative of GLOW and of homeschoolers in general.
- Anyone scheduling an event should read the Help information on Events on the GLOW website. This will include the event guidelines as well as how to use the event scheduling tool on the website.
- Events should be added to the calendar as soon as a date is considered so that other GLOW schedulers will not plan a conflicting event. You can set the Registration Start and End Dates to limit when members can sign up for the event.
- All events need to clearly state the name of the event, time, location, headcount limits, age range, price.
- Each event will have an extra dollar added to the ticket price that goes to the organizer. This is not optional – we want to encourage people to schedule events. How the extra dollar is added is decided by the event organizer. It can be per family, per child, per person, etc.
- Events with people or places that do not charge a fee will have a ticket price of at least $1 which goes to the event organizer. The event organizer can decide it the ticket will be per family, per child, per person.
- Payment will be collected by the event organizer, preferably through their personal account with an electronic service such as Paypal, Google Wallet, Venmo, etc.
- If the event organizer does not want to collect money through their own account, they may have another member collect money and mark people as paid. When doing this, the organizer and payment taker will take half the extra dollars from the event.
- Refunds are generally not given the day before and day of the event. We do not want to encourage no-shows and last minute drop outs. If there is a waitlist and a replacement can be found, a refund can be issued.
- The event date & time should not conflict with another planned or scheduled event appealing to the same children. Check the calendar.
- The age range for participating children needs to be clearly defined and carefully considered. Classroom style events should really not include children under 6 as this is the source of our biggest conduct complaints. Be clear about where non-participating siblings should be.
- Every event needs an event lead. The event lead is the GLOW person in charge at the event. This is usually the person organizing the event, but if not, clearly state the event lead person in the event description. The lead person does not pay the extra dollar to the organizer. The event lead is responsible for:
- Taking a list of registered members to the event and checking people in.
- Coordinating with the people or place hosting the event and paying for the group. The full amount should be paid to a venue even if people show up late or not at all.
- Keeping an eye on GLOW member conduct. If a child or adult is being disruptive, gently let the child or parent know.
- Facebook
- After the event is approved and made public on the website, add an event to the GLOW facebook group. Include event name, date, time, general location. The first line in the description is a link to GlowChs.com for signup. Also include the price and a description of the event. People want to see this when deciding if they should register for the website.
- Find the event post on the main discussion page and mark it as an announcement.
- No sign-up on facebook allowed except for free park playdate.
Instructions for Adding an Event
Note: The only free events in GLOW are park playdates. All other events need to include at least $1 extra that the organizer keeps. You can add the extra $ to every ticket, to just the child ticket, or to just the adult ticket.
- Check the Calendar. Make sure the event does not conflict with another event covering the same age group.
- Event Setup Tab
- Choose event category, and enter event title, date, time, location, including address.
- Write Event Organizer: and your name at the TOP of the Event Description. The full event description goes under the Organizer contact info.
- Ticketing Tab
- Overall event capacity – enter maximum headcount only if all ticket types add up to the event capacity. Otherwise leave blank.
- Limit number of tickets per registrant/account – Leave blank
- Ticket – you only need tickets for people who pay, count toward max capacity, or you just want to count.
- Ticket name can be “child”, “adult”, or something more descriptive.
- Ticket price – Some tickets can be free, but there must be at least one ticket type with a price and extra $ that goes to the organizer.
- Quantity available – how many of this ticket type are available?
- Limit, Count 1 ticket as, Override tax rate – leave as the default value.
- Questions tab – use this tab if you need registrant to answer a question about the event, like “What are kids ages?”
- Save: Warning message – click ok to the warning pop-up. You set up manual billing in the Advanced tab.
- Create more event ticket types if needed. For example, kids are $5 limit 30, adults are $1 with no limit.
- Waitlist – If you need a waitlist, create a Ticket type called Waitlist.
- Set the price = BLANK (not 0)
Registration Tab
- Use this tab if you want to set begin and/or end dates for when members can register for the event. We want events on the calendar as soon as you have a date so we can avoid scheduling conflicts, but you might not want to enable registration right away.
- You can also ask members a registration question here.
Advanced Tab
- Enter your email address for notifications in “Event Registration Notification”.
- Make sure to click option for “Allow offline payment”
- In the box that appears below Allow offline payment, enter how people can pay you – for example, your paypal info. You can include a Paypal.me link but make sure to also include your paypal email as not everyone will use the link. See the Paypal Blurb help topic for copy & paste template.
- Event Confirmation email: (Don’t remove any of the existing stuff in the email.)
- At TOP of email (above Thank You), add “Event Organizer:” your name, your email.
- AND the payment instructions in the email. It makes it easier to pay you.
Event Approval – After you create an event, it will go to the Event Admins for approval. While awaiting approval it will not be visible. Once the event is approved, your event will be visible on the calendar.
GLOW Facebook – After your event is approved, add an event to the GLOW Facebook page with a link to the Glowchs.com event.
Managing your event
- Open your event and click the Admin tab.
- Note: The Admin tab will be available if you created the event or if you are an event admin on the Glow website. If the Admin tab is not available, contact a Glow event admin for help.
- Attendee list – Dashboard tab
- Payment Received –
- Dashboard tab
- To mark a member as paid, click Edit/Void by their name in the list, then choose Record Payment Received.
- Unpaid amounts are shown in red.
- Answers to Registration Questions
- If you asked people to answer questions when registering, you can find the answers to those questions in 2 ways on the Dashboard Tab:
- Click on Edit/Void next to a registered member name, then choose Edit Registration.
- At the top of the Dashboard, click Export CSV. This will show you the registration info for all the people signed up for the event.
- If you asked people to answer questions when registering, you can find the answers to those questions in 2 ways on the Dashboard Tab:
- Waitlist – Create
- If you need a waitlist, create a Ticket type called Waitlist.
- Set the price = BLANK (not 0)
- Waitlist – Contacting
- Open the Event and go to the Dashboard tab,
- To contact the person, click the person icon next to their name in the list. (You can also Facebook message them if they are part of the Glow Facebook Group.)
- Waitlist – Convert Waitlist ticket to Regular Ticket
- To convert their Waitlist Tickets to Real Tickets, click on Edit/Void next to their name in the list. Then choose Edit Registration.
- Change their Waitlist tickets to 0 and enter a quantity in the real event tickets.
- Check the option for Resend Payment Receipt.
- Click Update Registration
- Print the attendee list –
- On the Dashboard tab, click Export CSV.
- Save the CSV file and open with your spreadsheet app. (Free spreadsheet apps available from Google and WPS.com)
- Feel free to delete unnecessary columns.
- Bring the attendee list to the event (or send to the person leading the event).
- If you cannot print, you will need to write it down.
- You will need a paper copy even if you use your mobile device in case there is a problem accessing the event dashboard online.
- Greet members as they arrive, introduce yourself as the event lead, and check them off your list.
The Event Organizer responsibilities:
- At the top of the Event Details, clearly mark the Event Organizer and Event Lead names.
- Refund or do not charge the Event Lead any extra $ that goes to the Event Organizer.
- If the event lead is not signed up yet, or if it is a popular event that will fill fast, the Organizer can manually add the Lead to the registration.
- Download and send the event registration list to the Event Lead before the event.
- Send the money for the group price of the event to the Event Lead if the money is being paid on the day of the event.
- Only Event Organizer admins logged into MembershipWorks.com/Admin can manage events other people created. Regular members will not be able to use the Dashboard screen in your event to see the registrations.
The Event Lead responsibilities:
- Arrive a few minutes early.
- Take the list of registered members to the event and check people in.
- Pay for the group. The full amount should be paid to a venue even if people show up late or not at all.
- Communicate with the venue and let the group know where to gather and any other instructions.
- Keep an eye on GLOW member conduct. If a child or adult is being disruptive, gently let the child or parent know.
- Open your event and click the Admin button. It should open in the Dashboard view. (Click Dashboard button if it does not.)
- Click Email button at the top. This will send email to everyone registered for the event.
- Send a nice email to everyone registered explaining why the event has been cancelled. Tell them their registration money will be refunded.
- Go back to the event dashboard, just under the event title, and click the button for Cancel Event & Refund All.
- This cancels the event but does not actually refund $ since we do manual payments.
- Go into your payment processor (Paypal, Venmo, Google Pay, etc.) and refund all the payments for that event. Put the event name in the comments of the refund.
Do have an idea but don’t know where to start?
Here are a few tips. And remember, you can always contact a leader for advice or mentoring.
If you are providing the event, for example a craft, project, or class, start by thinking about locations and cost. Parks are always the easiest location. To price your event, do you best to estimate the cost per child, then add $1. Think about what age kids would be interested and include the info on the event.
If you want to do a field trip or class at a venue, you first need to contact them. Some places have a field trip structure in place and you can find the info on their website. Some places require a phone call or email. If it’s an event that’s been done in the past, check with the past organizer or a leader to see how it was set up before. Some places don’t respond readily to calls or emails, but work out when someone talks to them in person. If your idea involves a place that does not usually do field trips, a personal conversation can help them understand what we’re looking for and let them see that it can be a cool thing to do.
Things to ask when inquiring about a field trip:
- What is the minimum and maximum # of students?
- How many total people can come? You may need to mention that all students have a parent.
- What is the cost per student or per person?
- Can younger siblings tag along?
- Tell them a date or date range, day of the week, time of day you would like to schedule. Or ask which days and times work for them.
- You may need to ask where the event will be.
If you feel uncomfortable contacting people for an event, or you set up an event but are not comfortable being the point person at the event… Get in touch with one of the GLOW leaders. There are no dumb questions and we can work with you. Gathering the info for an event and providing it to a leader can be a big help. Setting up an event and handing it off to someone else to lead is also an option.
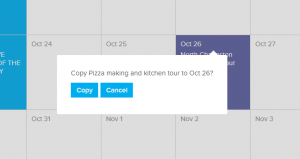
Note: This can only be done from a computer. It is not available on a phone or tablet. Contact an Event Admin if you need help copying an event.
From your event calendar, simply click on an existing event title, and drag it to the new date. If an event time is set, the new event will start and/or end at the same time on the new date. If the event spans multiple days, the new event will span the same number of days.
Event registrations will not be copied, but all other event information, ticketing, registration, and advanced settings from the old event will be copied to the new event.
Once the event is copied, you can edit the event as necessary to make any adjustment or changes.
Note that you should edit the event title/date within the first 10 minutes of copying the event, in order for the event URL to reflect the correct event title/date.
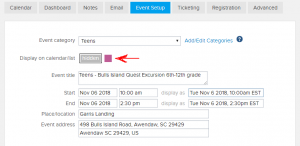
Open your event and click the Admin tab.
Note: The Admin tab will be available if you created the event or if you are an event admin on the Glow website. If the Admin tab is not available, contact a Glow event admin for help.
Click Event Setup tab to edit the main event details.
The other editing tabs are Ticketing, Registration, Advanced.
When an event is first created by a GLOW member, it goes into a “hidden” status until an Event Admin approves it. Once it is approved it will be visible in the event calendar. If it has been more than a day and you still cannot see your event, please contact an event admin or Glowchs@gmail.com.
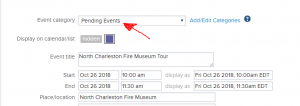
If you are a GLOW Event Admin and people cannot see your event it is either:
Hidden (look under Event Category). Click the color square to change it from the grey Hidden to visible in the chosen event category. (Make sure you scroll down and click Save after changing.)
Or it is in the Pending Event Category. Choose the appropriate GLOW event category to make it visible. (Make sure you scroll down and click Save after changing.)
You can copy & paste this blurb into your Offline Payment box on the Advanced tab when creating an event.
Paypal
paypal.me/YourPayPalHandleHere
(defaults to “Sending to a Friend”, do not check “Paying for goods or service”)
or
YourEmailHere
(must use “Sending to a Friend”, not “Paying for item or service”)
Please write NAME OF EVENT in the memo:
(and your Glow registration name if different than your paypal name.)
- Open the event and click Admin.
- Go to the Dashboard tab. (This is the default when you first click on Admin.)
- Click Edit/Void by the registered member name in the list, then choose Record Payment Received.
- Paid amounts are in black, Unpaid amounts are shown in red.
It is important to record payments in a timely manner. Recording the payment emails the member a receipt. Also, the member can see the events they registered for and whether they are paid or not in their Membership -> Manage Account -> History tab.
- 9Waitlist – Create
- If you need a waitlist, create a Ticket type called Waitlist.
- Set the price = BLANK (not 0)
- Waitlist – Contacting
- Open the Event and go to the Dashboard tab.
- If you had registration questions for the Waitlist ticket, click Edit/Void next to the member name. Then click Edit Registration.
- To contact the person, click the person icon next to their name in the list. (You can also Facebook message them if they are part of the Glow Facebook Group.)
- Waitlist – Convert Waitlist ticket to Regular Ticket
- To convert their Waitlist Tickets to Real Tickets, click on Edit/Void next to their name in the list. Then choose Edit Registration.
- Change their Waitlist tickets to 0 and enter a quantity in the real event tickets.
- Check the option for Resend Payment Receipt.
- Click Update Registration